Weissenborn Study #35, Part A
Weissenborn Opus 8/2, Study #35A for advanced bassoon
Comments
Weissenborn Opus 8/2, Study #35A for advanced bassoon students. Discussion of note lengths, fingerings, rinforzando, and marcato. The four components that can be used to make vibrato. By Terry B. Ewell, Bassoon Digital Professor. BDP #143A.
The original transcript is available here.
Videos
Captions are unavailable. The complete transcript follows.
Chapters
Transcript
0:19Rinforzando Markings
Welcome, this is Terry Ewell. Weissenborn study #35 is the case study for the rinforzando or "rf" markings. Weissenborn uses this mark throughout his studies to indicate a special type of emphasis in the quieter dynamics. Let's examine the two comparable passages in the study that illustrate how the "rf" markings are employed.
 Open full-size figure
0:50Comparing Rinforzando and Sforzando
Notice the similarity between the musical passages. At the start of the study the "rf" is placed as the climax of a quieter dynamic. In lines 9 and 10 a "sf" is placed at the climax in the louder dynamic. Thus you can see that "rf" is a special kind of stress in the quieter dynamics much like "sf" is a special kind of stress in the louder dynamics. You might say that "rf," rinforzando, is a quieter "sf," sforzando. The "sf" can also be written as "sfz."
1:32Staccato Note Lengths
Many students make the mistake of thinking that staccato notes are always short. Staccato doesn't mean short, it means separated. There should be some length to the opening staccato notes.
 Open full-size figure
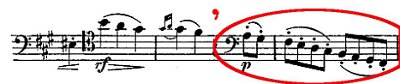
1:48Portato Note Lengths
In line 2 the portato notes, that is, staccato notes with slurs over them, are performed with even greater length.
 Open full-size figure
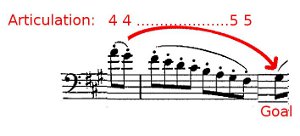
2:01Five Articulation Lengths and Phrase Shaping
Do you remember the five articulation lengths we practiced in the earlier studies? The lengths of these notes here should be 4 or 5. If you have mastery over these lengths, you can even create phrase shaping with notes lengths. For instance, I will play this passage and increase the note lengths from 4 to 5 in order to provide musical motion to the G#3 on the downbeat of line 3, measure 1.
 Open full-size figure
2:37Accidentals Carry through the Measure
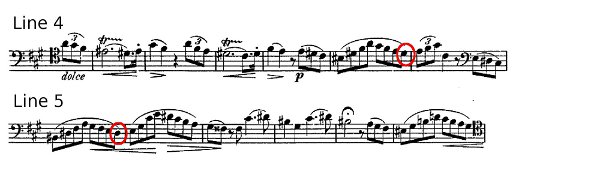
Don't forget that accidentals carry through the measure. In line 4 measure 5 there are two D sharps. Line 5 measure 1 also has two D sharps.
 Open full-size figure
2:52Staccato Marks and Articulation
A staccato mark refers to the length of the note not the start of the note. It doesn't mean that the note is tongued just because there is a staccato mark over it. For instance, in line 9 the dots over the notes indicate a separation between it and the next note, however, they are slurred not tongued.
3:13Correction on Staccato under Slurs
2019 Correction: I realize now that the statements above below are wrong. At the time I was recalling some piano music I had studied, but it is clear here and in other contexts that the note with the dot under the slur is re-articulated, tongued. For example, see this excerpt from Tchaikovsky's 2nd Symphony, the oboe solo in the second movement.
 Open full-size figure
Correction on Staccato under Slurs, continued
End 2019 Correction
 Open full-size figure
Correction on Staccato under Slurs, continued
F#3 starts with the tongue and then slurs to E#3. Two beats later B3 starts with the tongue then slurs down to A3.
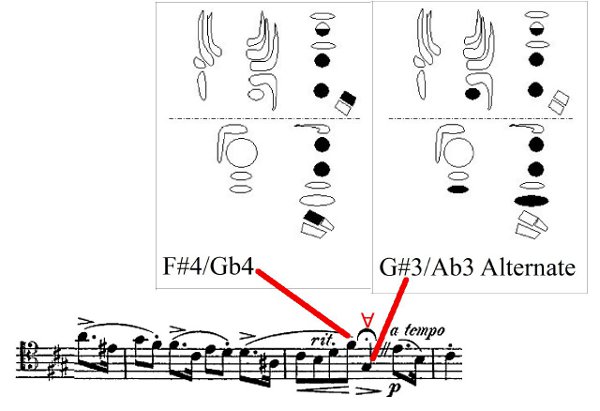
3:27Alternate Fingerings
There are a few alternate fingerings I use in the study. In line 3 at the fermata I use the thumb G# key for a smoother transition from F#4. My standard F#4 uses the right hand little finger.
 Open full-size figure
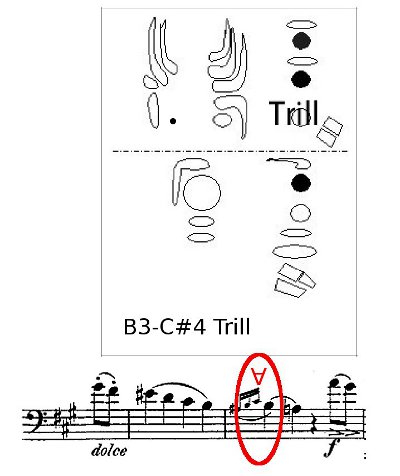
3:46B3 to C#4 Trill Fingering
In line 7, measure 6 I use the trill fingering for the fast B3 to C#4 exchange.
 Open full-size figure
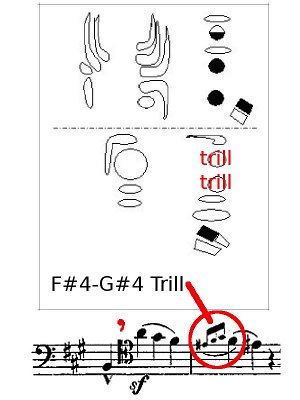
3:57F#4 to G#4 Trill Fingering
Similarly in line 10, measure 2 I also use the trill fingering for movements between F#4 and G#4.
 Open full-size figure
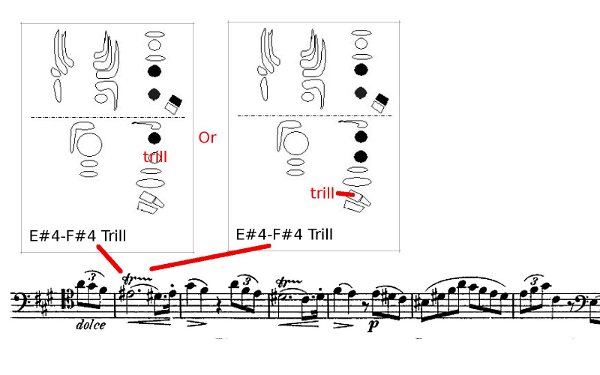
4:04Trill Fingerings
Weissenborn #37 will provide methods for practicing trills. Let me provide some fingerings, however, for this study. For the trill in Line 4 in the first complete measure use this fingering.
 Open full-size figure
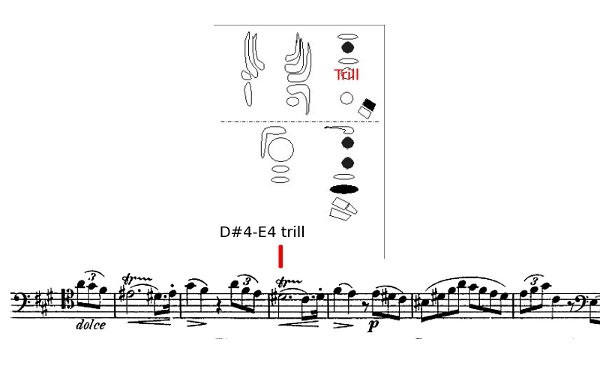
4:19Section
For the second trill in that line use this fingering.
 Open full-size figure
4:23Section
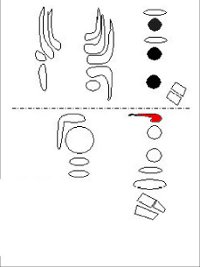
For the trill in line 9 you have two choices. I prefer the left hand C#4 but you can also use the C# trill key.
 Open full-size figure
 Open full-size figure
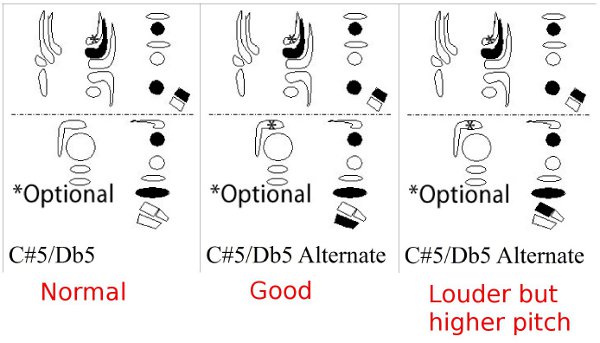
4:30High C#5 Fingerings
This is the first study with high C#, C#5. I use one of these three fingerings depending on my needs. The first fingering is the most common. It is not quite as full or loud as the last fingering, but is the easiest to use of the three and enunciates quite well. I almost always use both the D and C vent keys when I play this note.
5:06D#5 and Loud C#5 Fingerings
The second fingering provides a good approach to D#5, when needed. The last fingering is especially good when a loud dynamic is needed. This fingering is my choice for the exalted C#5 in the Shostakovich 9th symphony, fourth movement.
 Open full-size figure
5:27Marcato and Marcatissimo
This is the first study in the collection that uses marcato markings. Marcato markings indicate even more forceful and intense accents than regular accents. Weissenborn further provides the term marcatissimo to emphasize the extreme accents in line 9.
 Open full-size figure
5:50Breathing and Phrase Separation
Notice the similarity between the quieter passage in line 6 and the louder passage in line 9. I have marked in breaths in lines 6-7 and 9-10. You don't need to actually breathe each time, however, provide separation there and don't breathe after the pair of slurred quarter-notes. ------------------------------------------------------------------------ # REFLECTION Musical Expression vibrato
6:13Reflection: Musical Expression and Vibrato
In this reflection I will discuss vibrato. First I will identify possible sources for the vibrato and then recommend the use of a certain sound production component to produce vibrato.
6:27Section
Then I will apply "vibrato drives" or vibrato phrasing to some examples from the study and conclude with some exercises for vibrato mastery.
6:39Wind Performer's Guide to Increasing Endurance
Some of the material provide here is drawn from the Second Chapter of my monograph titled "Wind Performer's Guide to Increasing Endurance."
6:53Components Used to Produce Vibrato
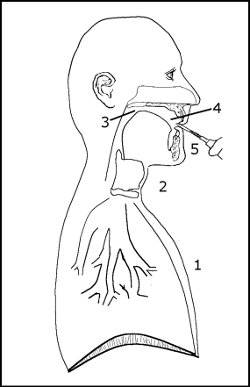
Bassoon performers have created vibrato from most of the five components for sound production: Component 1, the abdominal muscles; component 2, the throat area (larynx); from component 3, the back or pharangeal part of the tongue (this is the part of the tongue in the upper throat); and from component 5, the embouchure.
 Open full-size figure
7:22Abdominal Vibrato
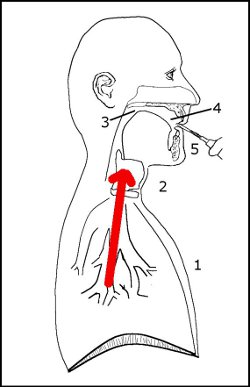
Component 1, the abdominal area, produces a slow and heavily pulsing vibrato. Many performers think that they produce vibrato from the abdominal area, but X-ray videos and small camera scopes have shown that the vibrato most bassoonists make originates in the throat area. These performers are probably feeling the back pressure in the abdominal area from the motions in the throat. When I produce a slow vibrato I have the sensation of vibrato in my abdominal area. As I increase the speed of the vibrato, however, the sensation appears to move up the wind column towards the throat.
 Open full-size figure
8:07Components Not Recommended for Vibrato
I do not recommend vibrato made from components 1 and 5. Component 1, the abdominal muscles should be employed for dynamic changes only. It also doesn't produce the variety of speeds needed. When component 5, the embouchure or jaw, is used for vibrato it can vary the pitch too much. In addition, it is best to reserve the embouchure for tuning and shaping notes.
8:39Throat Area for Vibrato
I recommend using the throat area, component 2, since this area is not employed for any other sound production needs. Component 2 can then operate independently from the other components. Some performers also sympathetically move part of the tongue in the throat when they create vibrato.
9:07Variations in Throat Vibrato
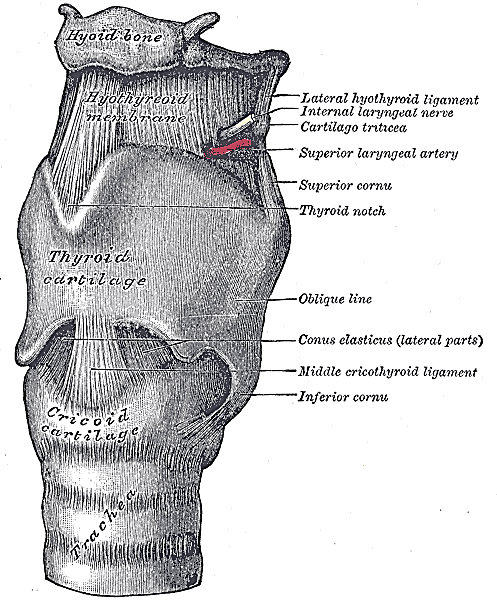
Many vibrato studies of woodwind instrument performers indicate that although the mechanisms for vibrato are contained in the throat area, the muscle groups used for vibrato can vary widely. There are many moving parts in our throat areas. Some parts are used by certain performers and other muscles and structures are employed by other people for vibrato.
 Open full-size figure
9:29Larynx Illustration and References
Larynx Illustration from Henry Gray, Anatomy of the Human Body, 1918, accessed from www.bartleby.com, 16 Aug 2006.
9:35Section
I provide references at the end of the video (see the transcript for Weissenborn 35B) if you wish to learn more about vibrato.
Credits
- author Terry B. Ewell
- composer Julius Weissenborn